Read Time 10 mins | Written by: Caleb Mabry

NAT Gateways, or Network Address Translation Gateways, are important for allowing computers on private networks to access the internet. When thinking about whether you should use an AWS managed NAT Gateway or creating your own, this guide will outline some of the pros and cons for each implementation and what you should take into account when creating your own.
Why Talk About This?
In many scenarios with smaller applications that don’t require specific security requirements or high bandwidth requirements, an AWS NAT Gateway is an excellent and cost-effective solution. You may run into problems when you start working with higher bandwidth implementations such as streaming large amounts of data. This could include things such as wanting to apply Endpoint detection and Response solutions or even limitations for the amount of packets being sent and even packet sizes! The world of technology is ever changing and sometimes the finer details can get you.
What is a NAT Gateway?
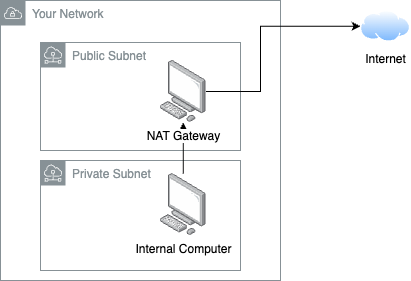
A NAT Gateway allows instances that are in private subnets to have outbound connections to the internet while preventing inbound connections to themselves. It’s important to note that without a NAT, instances that are in private subnets can’t reach the internet.
When an instance in a private subnet makes a request to the public internet, the traffic is routed through the NAT Gateway. The NAT Gateway maintains a translation table to keep track of the request. It replaces the instance’s private IP address with its own public IP address for the outbound request. When the response comes back, the NAT Gateway uses that translation table to route the response back to the correct instance in the private subnet.
When working with NAT in AWS, there are two different approaches you can take:
- AWS Managed NAT Gateway
- Self-Managed NAT Instance on EC2
Using AWS’s Managed NAT Gateway
AWS offers an easy way to create a simple, managed, NAT Gateway. These are easy to deploy and even easier to maintain due to AWS managing them for us. While managed solutions are great, it’s important to note that these solutions do have limitations.
Benefits
- Fully managed: No maintenance or patching required.
- Highly available: Designed to be resilient within an Availability Zone.
- Scalable: Automatically scales to accommodate throughput needs from 5Gbps to 100Gbps.
- Simple integration: One-click setup and straightforward routing configuration.
Limitations
- No customization: You can’t inspect or manipulate traffic, run intrusion detection, or control routing deeply.
- No logging: There’s no built-in access to raw connection logs.
- No fine-grained security: Can’t run antivirus, proxy, or detailed traffic shaping.
- Packet loss: There are a few scenarios where a NAT Gateway will start dropping packets if it is under significant load.
Cost
Like Milton Friedman says, “There’s no such thing as a free lunch.”, and that includes NAT Gateways.
- $0.045 per GB of data processed
- $0.045 per hour per NAT Gateway
In AWS, these costs vary by region. If you know what region you would like to host your NAT gateway in, you can check AWS’s webpage. To run some simple numbers you can see that at a Baseline Idle Cost (no data usage), you’re looking at:
$0.045/hour × 24 hours × 30 days = $32.40 per month, just to keep a single NAT Gateway running in one AZ. If you want high availability across 3 AZs, that’s $32.40 × 3 = $97.20/month in hourly charges alone.
Now adding $0.045 per GB of traffic. Let’s say you transfer 1 TB (1024 GB) outbound to the internet: 1024 GB × $0.045 = $46.08/month. That means your total monthly cost (for a single NAT Gateway with 1TB outbound): $32.40 (hourly) + $46.08 (data) = $78.48/month. The data costs seem miniscule but if you’re hosting an application with high throughput, it is important to note this potential cost increase.
Self-Managed NAT Instances
An alternative to AWS’s managed NAT Gateway is to run your own NAT on an EC2 instance. While it can be easy to create your own EC2 instance that acts as a NAT Gateway, it should be understood that there are many pitfalls you could experience.
Benefits
- Customization
- Logging tools such as iptables or nftables
- Intrusion detection using Suricata or Snort
- Caching or proxying with Squid
- Security monitoring: You can track traffic in and out in ways the managed service doesn’t allow.
- Flexibility: Pick your OS (Ubuntu, RHEL, Fedora), run additional scripts (CloudWatch agents, EDR, NAT failover scripts).
Drawbacks
- Operational overhead: You are responsible for:
- OS patches and security updates
- Monitoring instance health and scaling
- Handling high availability and failover
- Scaling limitations: Unless you set up ENA-enhanced networking and tune the OS, you may hit bottlenecks with CPU or network IO.
- High availability requires:
- Redundant instances in each AZ
- Elastic IP failover or route table manipulation - Risk of misconfiguration: A misconfigured iptables rule could break internet access or expose your network.
Bandwidth & Throughput Considerations:
AWS Managed NAT Gateway
- Designed for high throughput: Up to 100 Gbps per gateway.
- Scales automatically.
- Backed by AWS networking stack, optimized for performance.
Self-Managed NAT
- Depends on EC2 instance type:
- Certain instances support ~5 Gbps burst with limitations and others can support 10 Gbps or more. - Must consider ENA (Elastic Network Adapter) support for higher throughput.
- Performance tuning is manual, you may need to adjust:
- sysctl parameters
- iptables rules
- network stack settings
Conclusion
AWS NAT Gateways offer a simple, managed way to enable outbound traffic for private subnets, but they can be limited in control.
If you need fine-grained control, or custom routing, building a self-managed NAT instance on EC2 can be a great solution. So long as you’re ready to handle the operations and monitoring yourself!
Bonus: Creating a Self-Hosted NAT EC2 Instance with Ubuntu
There is a helpful template located on Github that will allow you to use a Cloudformation template to create the resources here.
Cloudformation creates a VPC for you that contains a public subnet and a private subnet. The public subnet gives you an Ubuntu 22 instance you can SSH into and a private Ubuntu 22 instance that can only be accessed through the public instance. The routing table has been configured so that all of the traffic from the private subnet will run through the EC2 instance that will act as our NAT in the public subnet.
From here, you can SSH into the public EC2 instance and begin configuring it to be a custom NAT gateway!
Once you have SSH’d into the public instance, the commands you will need to run are:
|
sudo apt update |
Once you have completed this, you will need to disable source/destination checks. Using the AWS console, you can select the EC2 > Actions > Networking > Change source/destination check - Then check *Stop*.
You can now SSH from your NAT instance into your private instance and `curl google.com` to get a response through your custom EC2 NAT! You can verify that your NAT is working properly by checking its public IP using
|
curl https://api.ipify.org && echo |
The IP of the private EC2 instance will match the IP of the NAT EC2 instance confirming that your NAT setup was successful.